Hey guys, this will be another quick post. Today I wanted to try out the “hello world” in a high level HDL called Migen. You can find Migen here. Migen is a Python-based tool that automates further the VLSI design process. Fundamentally it allows you to describe digital circuits in a python format called FHDL. While in FHDL Migen can use an internal python-based simulator to test inputs and outputs to your digital module. When your module design is complete you can have Migen transpose your FHDL to verilog HDL for synthesis tool consumption. The really neat thing about Migen is it helps solve a lot of the redunant pain of Verilog HDL statemachine design by leveraging python language constructs and providing signal auto-naming features.
Why try it now?
I’ve known about Migen for a while but I’ve always kind of been a Verilog purest, however I do appreciate new and upcoming ways to perform high level synthesis. The main reason I’m jumping into Migen now is because the PCIeScreamer platform I’ll be using for my UMDF driver work has wonderful example design called pce_injector which is written entirely in LiteX/Migen. The second reason is that I just backed a campaign by Bunnie for the NeTV2 and will be receiving a board. Now the NeTV2 is awesome in its own right and Bunnie’s mission with it is outlined here. However one of the interesting things about it is that the FPGA design is written entirely in LiteX/Migen. At some point I do want to understand how LiteX leverages Migen to build SoCs on FPGAs but for now I will start with Migen.
LED Driver in Verilog
If you recall from my previous post I explained what it looks like to create an LED driver in verilog with a 1.3ms period. The code looked a little bit like this:
module hello_world(
	input clk,
	input rstn,
	output reg led
);

reg [15:0] counter;

always @(posedge clk or negedge rstn) begin
	if (~rstn) begin
		led <= 1'b1; // active low (turn off on reset)
		counter <= 20'b0;
	end else begin
		counter <= counter + 1; // adder
		if (&counter) led <= ~led; // invert when all 1's, blink the LED!
	end
end

endmodule
I thought that perhaps a good way to jump into Migen is to try and design the same exact LED driver entirely in python. So here we go!
Installing Migen
At home I do mostly all my work in an Ubuntu-based VM, so I’m assuming you are as well. With a fresh terminal make sure you first install all your python3 tools with the following command: sudo apt-get install git python3 python3-setuptools. Next you’ll want to create a clone of Migen, so assuming you have git installed create a clone using this command: git clone https://github.com/m-labs/migen.git. Once you have a clone cd migen and then python3 setup.py install to finish the installation. You can now import migen into your python3 designs!
LED Driver in Migen
from migen import *
from migen.fhdl import *

class hello_world(Module):
	def __init__(self):
		# declare registers
		self.counter = Signal(16)
		self.led = Signal()
		# define I/O
		self.ios = {self.led}
		# describe sequential process
		self.sync += self.counter.eq(self.counter + 1)
		self.sync += If(self.counter == Replicate(1,len(self.counter)), self.led.eq(~self.led))

def _test(dut):
	i = 0
	last = (yield dut.led)
	while(1):
		curr = (yield dut.led)
		if (curr != last):
			print("LED = %d @clk %d"%(curr,i))
			i = 0
		last = curr
		yield
		i+=1

dut = hello_world()
print(verilog.convert(dut,dut.ios,"hello_world"))
dut = hello_world()

print("\nRunning Sim...\n")
run_simulation(dut,_test(dut))
class hello_world(Module):
So it took a little while to get the hang of the FHDL syntax but once I understood how it came together it looks pretty straightforward. In my design here I write my “hello_world” module as a class in python that inherits “Module”. Once you have declared your class your implementation starts in the python constructor __init__(self). In the contructor I split the code flow into three parts.
Signals
First I declare my registers counter and led. This is done by creating Signal objects with certian properties and assigning it to normal python vars. In this case I simply provide it a bit size for counter. The cool about this is that you don’t have to specify if it is a reg, wire, input or output. Migen figures it out contextually based on how you use the signal.
Defining I/O
As I mentioned Migen figures out the role of the signal based on context. In the next part of the code I assign self.led (a signal I declared before) as a signal to placed into the module’s IO list. At this point Migen would have enough information to know that self.led is an I/O but not enough information to know if its an input or an output.
Describing your module’s sync and comb
The way Migen describes sequential posedge triggered logic is by assigning all the sequential conditions in the module’s self.sync variable. Likewise for combinational statements, those statements are assigned in the module’s self.comb variable. The assignment operator Migen uses for this is +=
Clock and Reset
So one thing you don’t see explicitly is the clock and reset. Migen maintains a default clock domain specified as sys_clk and sys_rst. Migen uses this clock for its posedge sequential process blocks and uses the sys_rst conditionally inside those clocked blocks as an active-high synchronous reset for all registers inferred. There are ways to modify attributes of the clock domains but for this example I kept the default clock domain untouched.
Now the fun stuff
So if you remember from the verilog design there were 2 main clocked behaviors going on. First was the counter register add by 1 on every clock cycle. In Migen it is model as self.sync += self.counter.eq(self.counter + 1). The register assignment is done with the eq() method of the signal. At this point Migen sees a signal being assign a value in its sync, this should be enough to infer that the counter signal is indeed a reg datatype in verilog. Next in verilog we created a condition to check when all bits of the counter register are 1 by using the &(var) operator. In Migen the analogous syntax I found was: self.sync += If(self.counter == Replicate(1,len(self.counter)), self.led.eq(~self.led)) . In this statement the If function and Replicate function is used to trigger an inversion of the led signal. One interesting thing is that we can use the python len() function to get the size of a signal and replicate an object. By replicating a 1 as many times as the length of counter basically this checks to see if counter equals 16’b1111111111111111. If that statement is true then the led is inverted by using the python ~ operator.
Printing Verilog
So to print the verilog to stdout you have to skip to line 28 where we use verilog.convert to perform the tranpose. The line is print(verilog.convert(dut,dut.ios,”hello_world”)). We first created an object of our hello_world module and used it inside of the verilog.convert function along with the IO dictionary to print out the corresponding verilog syntax.
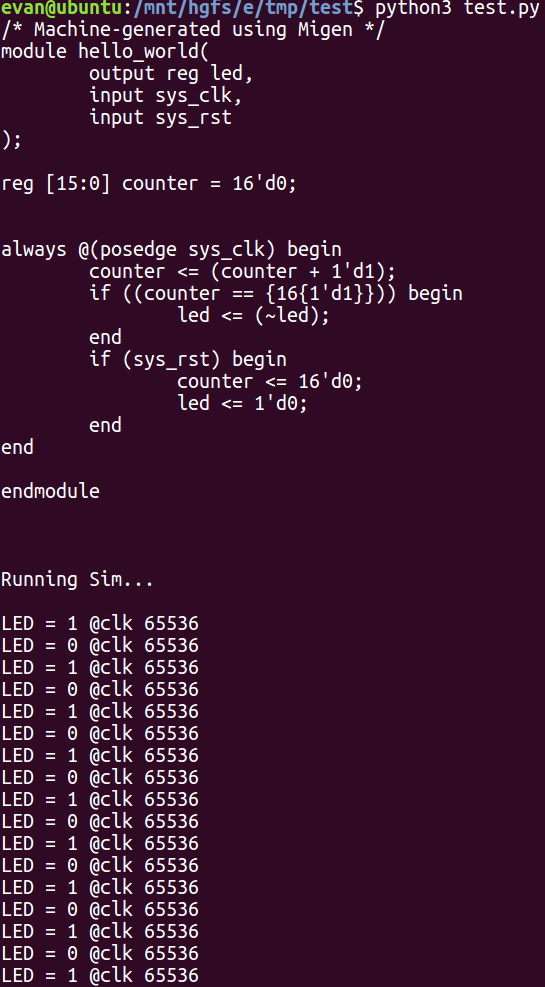
And there it is! Fairly similar to our verilog design. However in our verilog design we specified an asynchronous reset for our registers. In Migen it appears that the tools only support synchronous resets (which is not an issue). If there is a way to specify async I would love to know. Besides that everything else is functionally equivalent.
Simulation
Last but not least is simulation. Migen has a very powerful internal engine for similating FHDL. In order to simulate our design we leverage a new dut object and pass that object into the run_simulation function along with our test function named _test. Our test function is passed the dut object in as an argument and Migen utilizes python’s generator capabilties to contruct testbench behavior. With _test being our testbench, everytime yield is invoked by itself it is a simulation stepping of sys_clk. The way to read an output port in our test is by performing a (yield dut.led). As you can see in our test we keep track of the number of clocks passed and the last LED value. We only print when our LED output flips from 1 to a 0 or 0 to a 1.
Final
And that’s it! So I don’t claim to be an expert in Migen. I literally just picked it up about 4 hours before this writing. If anything in this post is inaccurate feel free to comment below. Thanks all!